https://heinzmovie.com FB: heinzmovie Insta: @heinzmovie IMDb: https://www.imdb.com/title/tt14956836/
Many thanks to the great team at Marvels Film for making this possible and successful!
https://heinzmovie.com FB: heinzmovie Insta: @heinzmovie IMDb: https://www.imdb.com/title/tt14956836/
Many thanks to the great team at Marvels Film for making this possible and successful!
The download location of the Marvels Cine Profile for Canon HDSLR, version3.4, has been updated.
If you’re looking for my Cine profile, click the link at the top of this page right under the banner to go to the updated Cine Profile page.
Wishing you all a happy and prosperous 2023!
Cheers!
Martin
A VERY short Fujifilm XT-3 real-world contrast test.
I shot a few contrast-rich scenes with contrast ratios exceeding 10 stops in some occasions, to test the F-Log and sensor performance.
Very harsh, very bright directional light at 12:00 noon.
Exposed-to-the-right, trying to balance between retaining shadow detail and not blowing out the HLs too much.
Lens: Fuji 50mm F2 + B&W Polarizer filter
Recorded in Prores-HQ 10 bit 4:2:2 on the Ninja V
X-T3 settings used: DCI 4K, HDMI output, Boost mode, Sharpness and Noise Reduction dialed down, No temporal noise reduction, No peripheral light correction, F-log.
Edited and cropped to 2:1 aspect; no scaling. Minor color correction, only blacks, mids and highlights adjusted.
The X-T3 held out great! Watch the fine detail and the shadow detail. It’s phenomenal – our Panasonic GH5-S is no match for this camera; the Fuji it blows it out of the water!
The Ninja-V was NOT behaving as expected; it still needs some special treatment when used with the Fuji X-T3. E.g: if you end a recording via the camera, the Ninja will flash black and the kangaroo icon appears; after that, most of the time, the Ninja will stutter and you will have to remove and plugin the HDMI. Nothing that a firmware update can’t fix i guess.
The X-T3 performed as expected, only…. i have two stuck pixels that are very dim and only visible in the shadows. It is no big deal; these pixels are so small. You have to know where they are, and disappear if you lower the blacks on the F-Log image. This is a €1.450 camera, so no complaints here!
Ever since day one with my new GH5s i suspected that there was something wrong with my glass (or my reading glasses), but after reading the GH5s EBU – Tech 3335 Assessment i’m starting to understand what’s going on.
The Panasonic DMC-GH5s does resolve less (or just zero) fine detail in 4k DCI (c4k) mode, either because there are not enough pixels, or because there is a lowpass filter installed that removes any detail for resolutions higher than UHD (makes sense…).
The attached test pics are self explanatory… The difference is pretty shocking in my humble opinion.
I’m pretty displeased with this, because i just bought this cam for shooting c4k, and traded my Atomos Ninja for a new Atomos that handles that resolution.
I hope (probably in vain) that Panasonic can solve this e.g. by switching the lowpass filtering along with the resolution (is it a physical filter, or digital? – excuse my ignorance) or at least shine some light on what’s going on.
Get ready, ye pixel peepers!
Download and view 100%.

UDH, HLG mode

DCI, HLG mode

UHD, V-LOG mode

DCI, V-LOG mode
At work in my office in 1996, doing 3D animation (painstaking!!) on a 19,500 dollar¹ Silicon Graphics Indy workstation.
Software was another 5,000 bucks. Rendering one SD (video-) frame (2 fields) took at least half an hour. A 30 second animation took a fortnight to render. So, you needed computing power, and thus another 2,500 for an extra “math processor board”. That brought render time down to slightly less than a week.
You’ll now find more processingpower in an iPhone 4…
In twenty years we’ll be laughing again, about what we do now and how much money we we’re willing to invest in technology that will be rendered obsolete in a few years from now. It hurts, but alas, that’s the way of progress.
More about this 100mhz, 32MB museum-piece: https://en.wikipedia.org/wiki/SGI_Indy
(¹ price in the Netherlands in 1996, approx. twice the US price plus shipment and taxes)

We offer an internship at the Dream Quest Images, Eindhoven (Netherlands) studio. (www.dqivfx.com)
Check out the DQi recruitment page here: http://dreamquestimages.com/recruitment/
As per september 1st, 2015, the Marvels Film’s visual effects and animation operations will continue (and be revived) under the name Dream Quest Images; which is now a registered trademark of Marvels Media.
We are excited to revive our SFX business under this legendary name, although we want to explicitly state that there is no connection or relationship with the previous owner(s) or facilities that operated under the name “Dream Quest Images” during the 90’s.
We respect the legacy of this memorable studio and will dedicate a page on our website to their legendary history, if the original founders and copyright holders allow us to do so.
More news will follow during the course of September. Meanwhile, there’s our Twitter @ twitter.com/dreamquestvfx and our Facebook page facebook.com/dreamquestimages

Hello friends! We need your help!
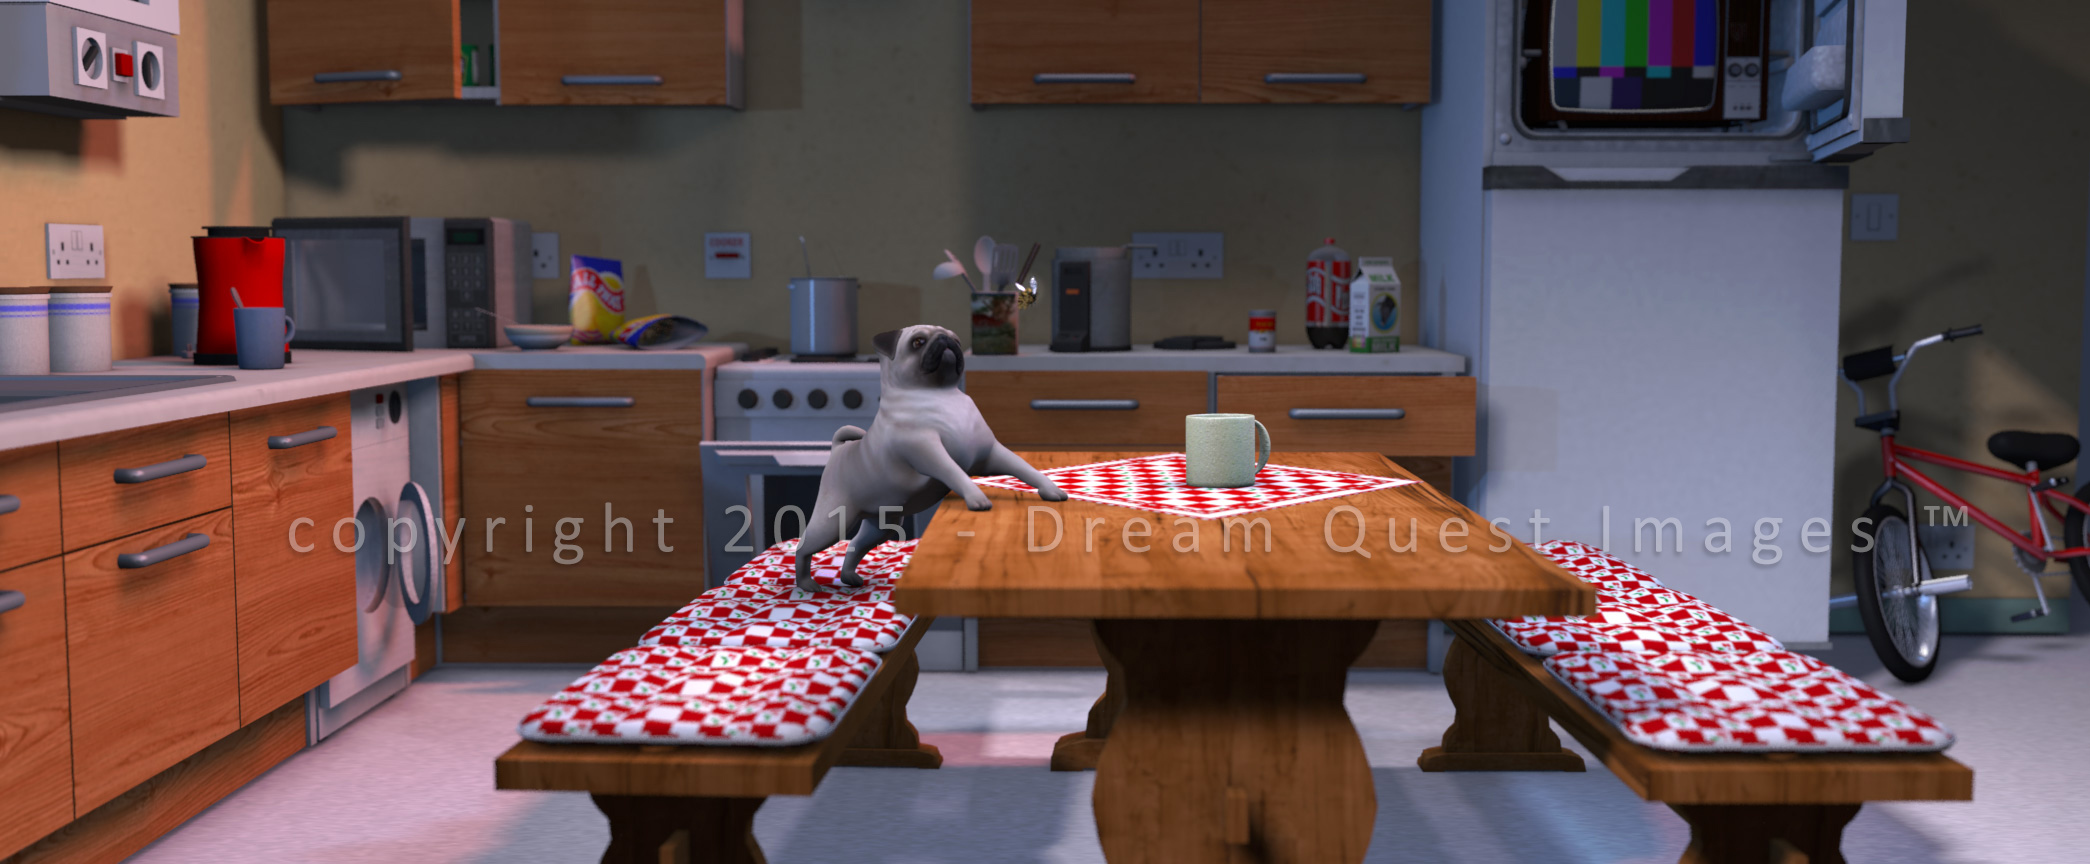
At Marvels we are working on a new animated series. It’s about a grumpy pug and a not-too-bright lumberjack-type who live out their days at the kitchen-table reflecting on everyday issues.
Very short 30 – 45 sec. sketches.

But we can’t decide on these character’s names!
Here a few suggestions taken from our Facebook page (https://www.facebook.com/marvelsfilm):
Buck & Pug
Fats & Eddy
Garry & Gunther
Harry & Barry
Jack & Zack
The rhyme is not mandatory 😉 Let us know what you think… Your input is much appreciated!
Meanwhile, our feature film Littekens (“Scars”, Director: Martin Beek) – shot on Red Scarlet & Canon glass – has been doing well in Asia (Hong Kong), Washington and will feature at the West Virginia Filmmakers Festival next month.


And with that event, the festival season is over for Littekens and we’ll start focusing on further distribution! Keep an eye out for Littekens!
Meanwhile, if you want to see the full movie now, it’s available on Vimeo on Demand here: https://vimeo.com/ondemand/littekens (with trailer and English subs).
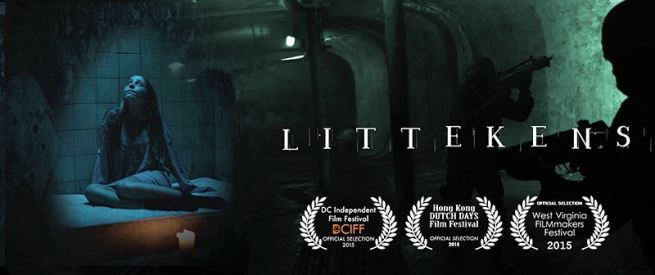
Website: http://littekensfilm.nl (Dutch)
IMDb: http://www.imdb.com/title/tt2748180/
Vimeo page with trailer: https://vimeo.com/ondemand/littekens
Facebook (English) page: https://www.facebook.com/littekens
Facebook (Dutch) page: https://www.facebook.com/littekensfilm.nl
The Marvels Cine Style Profile for Canon DSLR is free to use (also professionally/commercially) and to share, with the sole exception that you may not charge money for it.
If you like the free Marvels profile, we invite you to make a small donation via PayPal by clicking the link below. This is voluntary and much appreciated 😉
Each year around the 23th of December, i donate at least 50% of my yearly “picture style income” to charity, via eBay GivingWorks and (previousely) eBay MissionFish. Between 2011 and 2015 i donated 554 dollars to 4 different charity projects, thanks to your generous donations.
Donate HERE by PayPal or Creditcard if you use our Picture Style.
It’ll be well spent!
Martin


Recent comments